
J.League Matchday "First Impressions": Summarized notes from various games

This will be a series based on my notes that were (mostly) taken live during the game, then short summaries compiled at Half Time and again at Full Time.
Most of these games are just from a first watch, they are very rough summaries of the notes I took so probably not as refined and I imagine there are some things that will appear differently if I decided to re-watch these games again (these summaries may not reflect my complete opinion on players/teams upon further reflection, etc., etc…).
There’s so many games I don’t get to talk about because I don’t have time to write up a full blown review on them so perhaps this is a good compromise. I’m not going to do this for every single match that I watch but hey, it might give people more insight into my thought process.
Let’s get started!
MD Sanfrecce Hiroshima vs. Albirex Niigata
Albirex don’t usually drop their double-pivot to split the Center Backs, preferring to build-up in a 2-2 centrally (2 Center Backs plus 2 Central Midfielders).
Against a team like Sanfrecce who like to press high and with ferocity this seems risky but Niigata are used to playing under pressure and they also use their goalkeeper, Kojima as the extra man in the build-up.
This makes it so that Niigata can have numerical advantage in the backline without sacrificing the 3v2 advantage they have in midfield due to Ryotaro Ito dropping to receive. This means that Sanfrecce’s double-pivot are fully occupied with marking Niigata’s double-pivot themselves, leaving Ito free.
Usually Sanfrecce solves this problem by having their Center Backs follow dropping players but this didn’t happen for some reason.
Sanfrecce took a lot of shots (as they usually do) but I don’t think they were necessarily great chances. Some still were, of course but I feel like those were good strikes of the ball (finishing quality) and not shots taken from dangerous places (chance creation quality).
While as a total sum, their xG came out at a pretty high 2.3 xG… you have to realize that this number came from an accumulation of lots and lots of small xG chances rather than lots of good chances.
For the most part, while Niigata had to cede a lot of territory to Sanfrecce in the 2nd Half and had to defend in their own box, this also meant that they had enough numbers to make blocks and they could steer Sanfrecce players to take shots from angles that were easily covered by Kojima. Indeed, it took a ludicrous wonder-volley from Tsukasa Shiotani for Sanfrecce to even have a chance of tying the game up late in the 2nd Half.
3-5-2 with Notsuda as a single pivot and two strikers to offset the problem where Ben Khalifa drifts wide and there’s a lack of numbers in the box for the eventual cross
talked in the 2022 mid-season review about this last year but
still puts a lot of burden on Notsuda to cover the entire back-line by himself but had to go for broke at 0-2 down at half time
always about trade-offs though
MD #9 (April 23rd, 2023): Nagoya Grampus vs. Shonan Bellmare
Nagoya Grampus:
1st Half: Start in a Mid-low block with Junker sitting deeper to mark Okuno while Nagai and Mateus positioned narrow keeping tabs on the Center Backs. Wing Backs watch their Shonan counterparts around the half-way line. Only push up only certain triggers like a backwards pass. Yonemoto and Inagaki hold the center by themselves to intercept and tackle anything that comes their way. Yonemoto especially would be the one to play the vertical pass straight to one of the front 3 to start a counter making a run behind Shonan’s high line or Junker would drop to play lay-offs. Nagai and Mateus would peel wide through diagonal runs to effective receive behind Shonan’s back-line. Morishita and Uchida comfortably defending against Shonan’s attack while any simple crosses are cleared away with ease by the Back 3. However, sometimes Nagoya were a bit too lax or reactive and let Shonan receive in central areas like in 28th or 36th minute.
2nd Half: Pressure and work-rate of front 3 drop and Nagoya are pushed deeper and deeper back into their own Defensive 3rd. Counterattacks start from much deeper which means there is a much greater distance to travel to get to goal which makes it difficult and further diminishes the energy of the Front 3. Shonan’s high press also prevented easy passes from Nagoya’s back-line into midfield or the time/space needed to make accurate long balls into the Forward line. Poor passes that were easily intercepted or cleared back into Nagoya’s half allowed Shonan to keep the game in Nagoya’s half. Yonemoto still worked very hard to block or intercept and try to push Nagoya forward on the counter but to no avail as the Front 3 tired and the rest of the team also couldn’t keep up with them. Taiga Hata came on at half-time and terrorized Uchida to the point where Morishita had to swap wings to deal with him. While Nagoya did have a few decent counter chances (including a disallowed goal) and from set-pieces, they couldn’t find the elusive 3rd goal.
Shonan Bellmare:
1st Half: Started off the game with lots of possession but keep forcing things by going directly down the line and not find Machino or other players in central or half-space areas. Attacks were still able to push into the final 3rd in this way but stagnated from there as neither Nakano nor Ishihara were able to beat Morishita and Uchida on the dribble and their simple crosses were knocked away with ease. Shonan’s high press against Nagoya’s back-line was somewhat successful but from there they couldn’t take advantage of their short counterattack opportunities. Otherwise, they were still able to force Nagoya to go long on low % attacks. Shonan’s back-line had difficulty dealing with Nagoya’s front 3, especially the diagonal runs that pulled defenders around/away from the box.However, Shonan were slowly able to start finding good opportunities to pass or progress centrally instead of simply down the line like in the 28th and 36th minutes. As time went on, Shonan’s Wider Center Backs became more proactive and aggressive to push into Nagoya’s half on the dribble and force Yonemoto and Inagaki into dilemmas (if close down Center Backs: then opens space for other Shonan attackers. If not: simply allow the Center Backs waltz un-pressured into the final 3rd). Initial conservativeness from Shonan made sense due to the threat of Nagoya’s counters but Sugioka became more adventurous in the last 15 minutes or so of the 1st Half. Machino and Abe worked together (one drop, one make a run deep in-behind) but found it tough to escape from the strong Nagoya players stationed in the Center.
2nd Half: Shonan were more pro-active in trying to play vertical passes in central areas rather than simply going down the wings. Abe was able to find Machino in the half-spaces and centrally outside the box more to threaten. Okuno was used a lot more in the 2nd Half as Shonan were able to push into Nagoya’s half with more regularity and use him to spread the ball from side-to-side to create gaps in Nagoya’s defensive block. Shonan’s press continued to be aggressive and prevent Nagoya from building-up with the ball cleanly and prompt hurried clearances rather than thoughful long passes into Nagoya’s Front 3.
Player Interviews: (Grampus) Mitch Langerak, Ryoya Morishita. (Shonan) Hiroyuki Abe, Shuto Machino.
Manager Interviews: (Grampus) Kenta Hasegawa. (Shonan) Satoshi Yamaguchi.
MD #9 (April 23rd, 2023): Albirex Niigata vs. Kashima Antlers
Albirex Niigata:
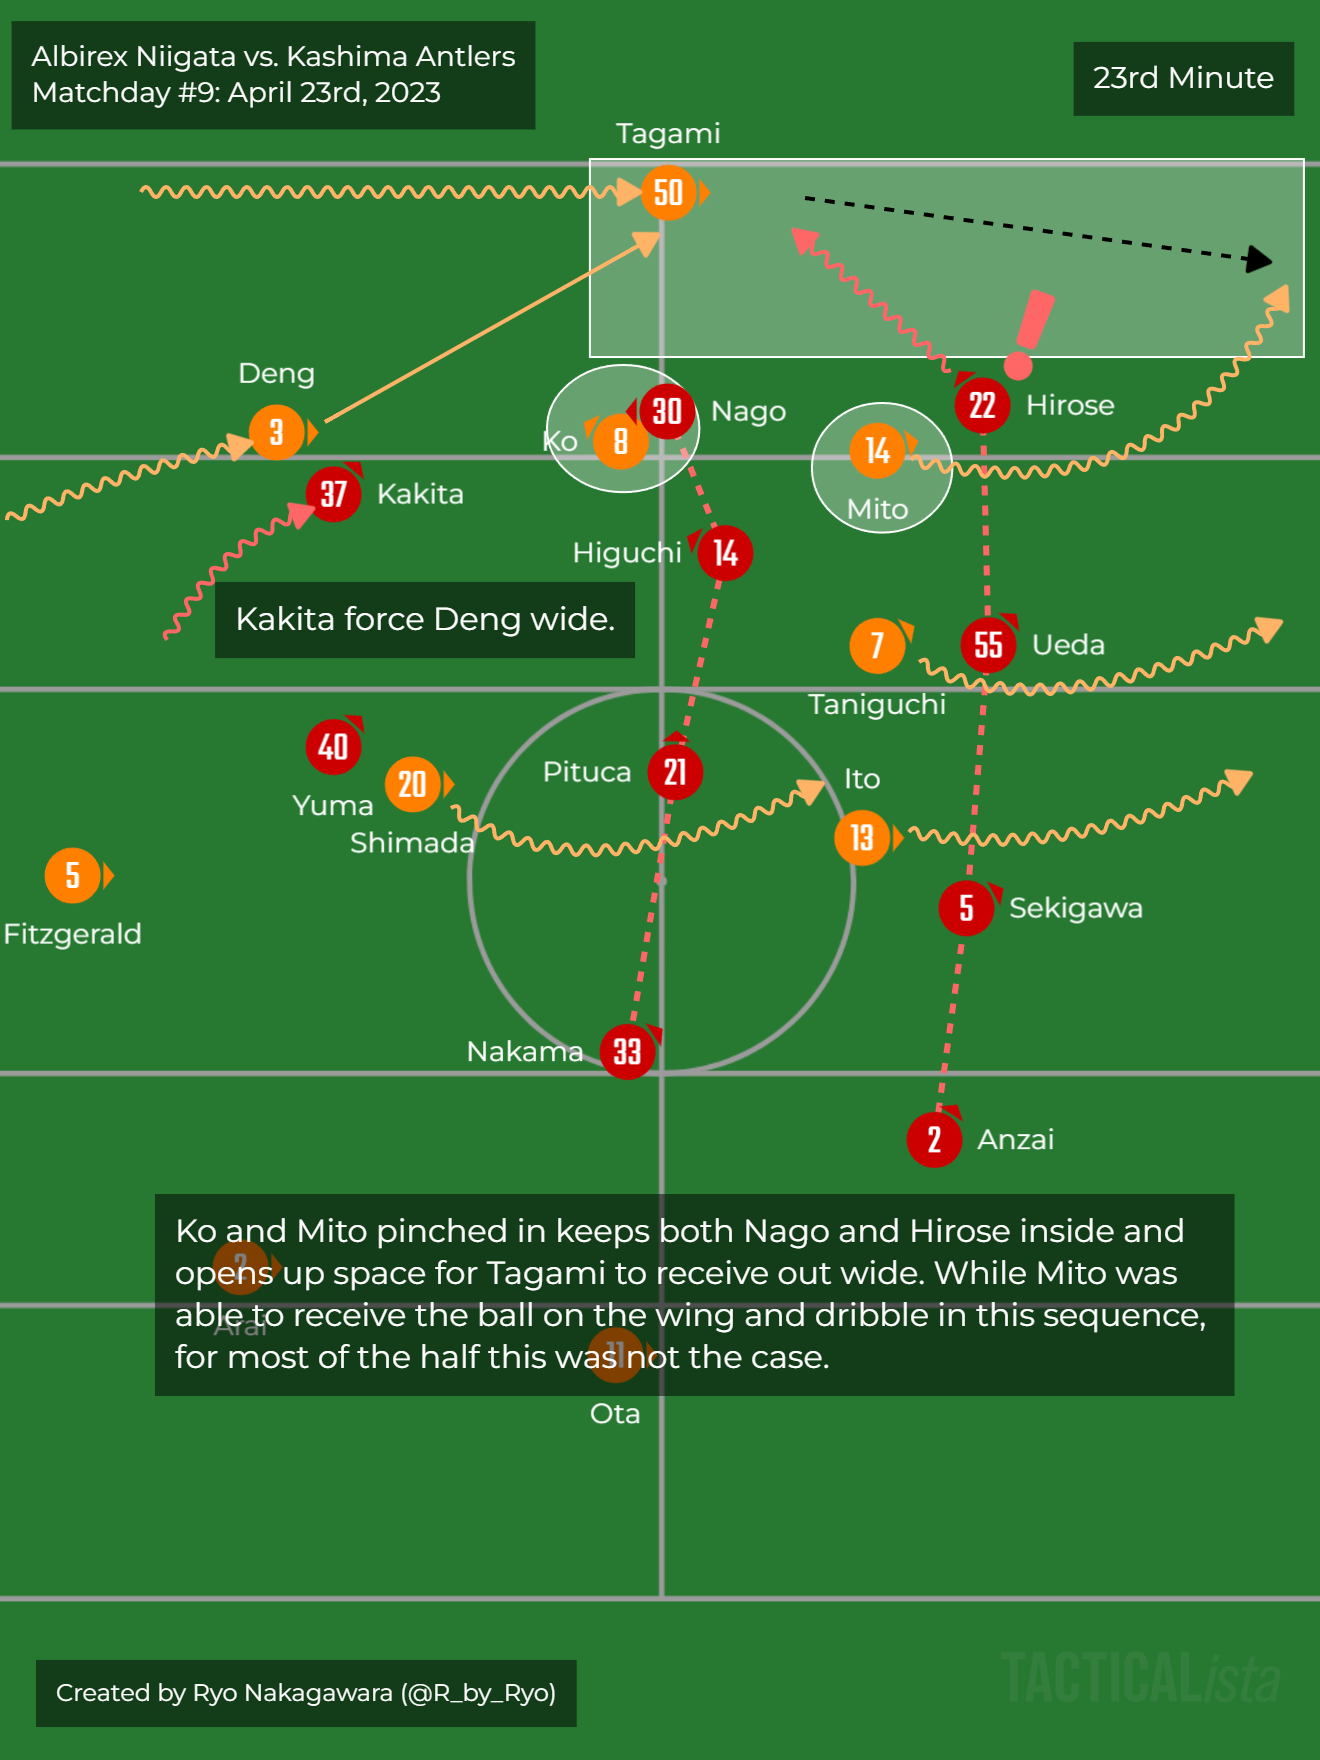
1st Half: Both Center Backs left relatively free and were able to carry the ball up-field to the halfway line but vertical passes centrally into the midfield or forwards were generally blocked. Yuma and Kakita followed the Center Backs from the inside, which forced them out wide to the sidelines but from there the Full Backs did not have a forward or inside option and were forced backwards to recycle possession. Still, there were occasions where Deng or MJ were able to find vertical passes in the half-spaces or gaps between-the-lines but Antlers were quick to recover and frequently applied a lot of pressure on the lay-off receiver to prevent the Niigata player from playing the ball forwards or switch it to the weaker side. Mito pinched inside to get Tagami open but due to aforementioned reasons, was unable to do much past that. Both Niigata wingers were unable to face forward on the ball an dribble to attack with speed. They were mainly forced to act as ball receivers floating around between the lines with their backs-to-goal.
2nd Half: Same as 1st Half. Lots of possession in Kashima half as Antlers backed off and gave Niigata’s Center Backs time/space on the ball to push past the halfway line but from there they struggled to push into the final 3rd or box. There was no entry points in the central areas and Kashima forced Niigata wide. From there Niigata were attempting lots of quick combinations in very tight spaces out wide which didn’t have a whole lot of probability in succeeding. 66th minute chance was about the only time they really crafted a nice move (3rd man run from Arai) but even then it was not a very clear-cut chance at all from Nescau. Lots of vertical passes in midfield were intercepted and crosses and shots were easily blocked or cleared.
Kashima Antlers:
1st Half: Defended in a 4-4-2 mid-block. Both strikers (yuma and Kakita) wouldn’t press high on the Center Backs, only track them as they brought the ball up and force them to the sidelines. The Midfield would shift over quickly to then prevent Niigata’s Full Backs from playing square passes back inside or throughballs down the line to the wingers. For the most part, Kashima were able to force Niigata backwards or even spring a counter after winning the ball. Both Yuma and Kakita were quick to apply pressure on any Niigata Central Midfielders receiving lay-offs to prevent them from getting off a forward pass or a diagonal switch. In possession, Kashima would build-up with a Back 3 (Anzai pushing up as a Left Winger, leaving Hirose to tuck close to the Center Backs) and as usual were content with long balls to Kakita as the target man in central areas or he would peel wide to create time and space for the rest of the team to arrive in support. In general, Kakita’s presence decreased the load on Yuma to “do everything” and focus more on chance-creating and shooting in the final 3rd. The two combined quite well in this manner for the 2nd goal. Otherwise, the Center Backs and Center Midfielders would swing long diagonals across to either wing and Anzai to then provide simple crosses into the box. Pituca sat back a bit deeper to do this while Higuchi would push up a bit more to support the attack.
2nd Half: Continue with the same plan as from the 1st Half, even after Yuma came off due to injury and was replaced by Kei Chinen. Kakita continued to peel wide to receive long balls in the final 3rd to relieve pressure on Kashima’s defense, even though this didn’t lead to a whole lot of chances directly. Defenders and midfielders, especially Pituca intercepted or blocked passes into the central areas very well. Completely shut down Albirex Niigata.


Note: Matsuhashi’s half-time comment to his players about how “the only players falling onto the ground were wearing orange kits” was a nice quote and pretty much encapsulated how Kashima simply outmuscled/overpowered Niigata throughout the game. Iwamasa’s post-match comments were interesting… as usual.
Player Interviews: (Niigata) Shunsuke Mito, Ryotaro Ito. (Kashima) Yuki Kakita.
Manager Interviews: (Niigata) Rikizo Matsuhashi. (Kashima) Daiki Iwamasa.
MD #9 (April 23rd, 2023): Kawasaki Frontale vs. Urawa Reds
Kawasaki Frontale:
1st Half: Build-up goes smoothly in first 20 or so minutes and able to enter final 3rd. Usual numbers to overload wide areas to cross but Urawa defense strong and dispossess or easily block/clear crosses. With Frontale attackers and Noborizato going to the far post, high aerial crosses aren’t very effective… Miyashiro made lots of diagonal runs into the half-space pockets to receive but can’t do a whole lot from there to take advantage. Frontale’s high press did create some short counter opportunities but in the last 10~15 minutes of the half, Urawa able to find ways of progression. Kota Takai good on the ball and in defense.
2nd Half: Despite taking lead, can’t control game via possession and high press completely stopped working except for one Tono opportunity in 65th minute.
Urawa Reds:
1st Half: Urawa struggle at first to build-up and progress forward to get past Frontale’s press cleanly. Even when find avenues they can’t find good opportunities to take shots. Last 10~15 minutes looked more promising with quick counters starting from central midfield but lack shooting chances again. Mostly resorting to crosses…
2nd Half: Much better in build-up continuing on from last 10~15 minutues of 1st Half and push into final 3rd via a mixture of short/long passes. Still can’t break into box and take shots. Continuously able to get Full Backs to push high up but simple crossing isn’t effective at beating Frontale’s defense…
Note: Both teams were very quick to recover in negative transition and make it difficult for opponent to break down or enter the box to get good shots which made for a pretty stale game from an entertainment point of view.
Player Interviews: (Frontale) Akihiro Ienaga, Yasuto Wakisaka, Shin Yamada. (Urawa) Bryan Linssen
Manager Interviews: (Frontale) Tohru Oniki. (Urawa) Maciej Skorza.
MD #9 (April 23rd, 2023): Kyoto Sanga vs. Sagan Tosu
Kyoto Sanga:
1st Half: As usual, press very high and disrupt Tosu’s build-up and counter or at the very least, force long balls. Kyoto were able to enter the final 3rd for a good portion of the 1st Half and although they created threatening situations, they couldn’t get off great shots. Then they were completely out-done in transition against a very clinical Tosu team against the run of play.
2nd Half: Kyoto’s plan didn’t change a whole lot but it was all for naught as Ichimi got himself sent off. To their credit I thought they were reasonably good with only 10 men but ultimately it was too large of a hill to climb.

Sagan Tosu:
1st Half: Build-up under heavy Kyoto pressure was mainly unsuccessful despite a few decent possession sequences. Tosu were mostly forced to loft long balls to the wings or behind Kyoto’s high defensive line but were mostly unsuccessful in being able to create lots of chances. Their few successes mainly came from creating situations where Ono and Honda would drop to receive the ball, in tandem Naganuma and Iwasaki would make diagonal runs inside to receive through or long balls from Kawahara or Moriya who had received lay offs from Ono/Honda and were able to face forward on the ball. Despite their struggles however, Tosu managed to be very clinical on the very few chances that they were able to create despite going down a goal first and went into halftime 3-1 up.
2nd Half: Despite a man-advantage for most of the 2nd Half due to Ichimi’s red card, Tosu struggled in possession oddly enough as Kyoto continued to press them despite being a man-down. They were still able to hold on and not concede until the penalty deep into added time but it was a bit of a concerning performance from them.

Player Interviews: (Kyoto) Shogo Asada, Taiki Hirato. (Tosu) Yuji Ono, Yuto Iwasaki.
Manager Interviews: (Kyoto) Cho Kwi-jae. (Tosu) Kenta Kawai.
MD #10 (April 29th, 2023): Yokohama F. Marinos vs. Nagoya Grampus
Yokohama F. Marinos:
Nagoya Grampus:
Player Interviews:
Manager Interviews:
MD #10 (April 29th, 2023): Avispa Fukuoka vs. Kawasaki Frontale
Avispa Fukuoka:
1st Half: High press was not very effective as when double pivot push up to mark Schmidt, it simply left spaces for Wakizaka and Seko to enter and receive between the lines. Sometimes Yamane would invert from Right Back to receive in central areas as well which pulled Avispa’s wide midfielders inside, in turn this let Frontale’s Center Backs have more space to dribble forward toward the halfway line. Long balls to Lukian in Central or Wide areas weren’t effective. Avispa were relatively okay defending their own box in lots of numbers as they could easily deal with Frontale’s high crosses in the air but had to be careful to not let their defenders get dragged around and allow box entries for dangerous cut-backs.
2nd Half: Avispa only started to gain territory and the ball from around the 60th minute. Both Mae and Tanabe were able to find more gaps between the lines to receive in and then spread the ball wide to the wide midfielders and Full Backs pushing up on the wings. Avispa were able to swing the ball left-to-right and vice-versa to shift Frontale’s defensive block and with the smart movement of Sato and Tsuruno in/around the box were able to finally create spaces to get shots off. Avispa were able to pull 1 goal back but it was still too little too late.

Kawasaki Frontale:
1st Half: Lots of good build-up variations with Schmidt and Seko moving around to find gaps between Avispa’s forward and midfield lines. Frontale were able to enter the final 3rd and create enough time there to then push numbers into the box and move Avispa’s lines around. In terms of chance creation low cutbacks were more effective than high crosses against Avispa’s defense. Both Takai and Kurumaya had an easy time against Avispa’s long balls and were also able to play good vertical passes in the build-up to progress the ball up-field.
2nd Half: Lots of good combinations on the wings and cut-backs to score the goals to put the game away in the 2nd Half. Frontale were then able to keep possession as in the 1st Half and keep Avispa at bay but slowly started to lose control from around the 60th minute. Frontale then had to resort to long balls behind Avispa’s defense to force them backwards but otherwise Avispa were able to lay siege to Frontale’s box and get a goal back in the last 20 or so minutes of the game.
Player Interviews: (Avispa) Tatsuki Nara, Reiju Tsuruno. (Frontale) Yasuto Wakizaka.
Manager Interviews: (Avispa) Shigetoshi Hasebe. (Frontale) Tohru Oniki.
MD #10 (April 29th, 2023): Cerezo Osaka vs. Sanfrecce Hiroshima
Cerezo Osaka
1st Half: Struggled to play past Sanfrecce’s intensity as vertical passes from the Center Backs and square balls back inside from wide players were intercepted and Sanfrecce could quickly counter. Long balls were largely dealt with and Ceara didn’t have a lot of support close by to collect 2nd/loose balls in the mid-3rd of the pitch. Rare successes came from pulling Sanfrecce’s players up the field, playing the ball long, then an un-marked Cerezo player would receive a lay-off to face forward to then push in the Sanfrecce half. From there though, Cerezo lacked the creativity to create shots, nor were there enough numbers nor quick enough over the long distances players had to travel to support the attack. Cerezo couldn’t create time for the rest of the team to push up and keep possession further up-field.
2nd Half: Able to get more players forward in support of attacks and also quicker tempo to get past Sanfrecce’s counterpress to release Ceara or wide players forward. But again, lack numbers in box especially if Ceara peels wide to receive the initial through/long ball down the channels. Usually Okuno make up for lack of central presence with runs into the box but not enough options to trouble Sanfrecce’s back-line so crosses cleared easily. Jonjic was relatively comfortable but his passing was poor.

Sanfrecce Hiroshima
1st Half: High press and general intensity push Cerezo back into their own half but while chances created in numbers, mostly from crosses and set-pieces. Even when Cerezo were able to swing the ball wide quickly, Sanfrecce’s midfield would track back to close the gap between the Defense and Midfield lines to prevent Cerezo from facing forward with the ball or switch the ball to the opposite side with speed. Besides Kawamura’s chance, still not creating clear-cut chances. If Sanfrecce can’t create moments where they are running at pace vs. Cerezo defenders, they were unable to get into the box from the final 3rd and were stuck circulating the ball on the wings until an eventual cross was met with an inevitable clearance.
2nd Half: More runners and stretching Cerezo’s back-line horizontally to get 3rd-man runners into the gaps to exploit (like 84th minute) but still can’t find clear shots except the “ideal” chance created in the 65th minute. Araki had a very comfortable game at the back.

Manager Interviews: (Cerezo) Akio Kogiku. (Sanfrecce) Michael Skibbe.

MD #11 (May 3rd, 2023): Sagan Tosu vs. Marinos
Sagan Tosu:
1st Half: In the build-up, Tosu were able to get Kawahara and Moriya to face forward on the ball very easily past Marinos’ 1st line of press (Lopes plus one of Elber/Nishimura/Yan). From there the two midfielders were able to pick out players in the forward line dropping to receive and then be given the ball back higher up the pitch or more directly lob long balls down the wing for the Tosu wingers to take-on Marinos’ full backs 1v1. Tosu’s forward line interchanged with each other a lot and made it hard for Marinos’ midfield to catch them. Tosu’s press wasn’t very effective with a few exceptions as Marinos moved Tosu’s players around and quickly played into the open spaces. Tosu were gradually pushed back into their own defensive 3rd with chances only coming through a few quick long counterattacks but they mostly ended with ineffective crossing attempts. The moments of real danger from Tosu came from cut-backs by Iwasaki.
2nd Half: Slowly able to push into Marinos’ final 3rd despite Marinos improving their press against Tosu’s back-line at the start of the 2nd Half. However, chances came more from set-pieces (corner kicks and free kicks) rather than through open-play even if Tosu did well to threaten and earn these in the first place. Tosu still had difficulties to break down Marinos in their box and they seemed to have ran out of steam in the last 10~15 minutes of the game as they couldn’t dominate on the ball like they did in earlier parts of the 2nd Half.
Marinos:
1st Half: High press against Sagan Tosu’s build-up was quite poor as Tosu were able to get past Marinos’ first line of press very easily to allow Moriya and Kawahara time on the ball facing forwards to progress up the field. Tosu’s goal was also a result of Marinos’ lacklustre press as despite the team pushing up, they didn’t win the ball off the throw-in, which then left the defense exposed and having to retreat back to their own box. In turn, their build-up against Tosu’s press was decent, despite a few instances of Ichimori’s poor judgment on the risk/reward of a vertical pass for a teammate. Marinos were able to switch the tempo of their passing from slow-fast (and vice-versa) to progress the ball from the back through both wide and central areas with Joel Fujita and Kida working well together as well as Nishimura dropping into spaces. Yan Mateus was extremely effective on the dribble 1v1 against make-shift Left Back, Kikuchi.
2nd Half: Marinos improved their pressing in the 2nd Half as they took a bit more risk by pushing their midfielders up higher to mark Kawahara and Moriya in Tosu’s build-up. For the most part, they were able to prevent them from facing forward on the ball behind Marinos’ first line of press and were able to force Tosu to kick it up long from deeper in their own half but Eduardo and Hatanaka were usually equal to clear it back from the halfway line. However, as Marinos looked to play it more quickly on the counter and penetrate Tosu’s high line, they weren’t able to dominate possession and keep the tempo of the game down and push Tosu into their own half. So while Tosu were able to lay siege to Marinos’ box through set-pieces, Marinos did enough to prevent clear cut chances through some good tackling and interceptions in and around the box.
Player Interviews: (Tosu) Park I.G., Fuchi Honda. (Marinos) Elber, Yan Mateus.
Manager Interviews: (Tosu) Kenta Kawai. (Marinos) Kevin Muscat.
MD #11 (May 3rd, 2023): Nagoya Grampus vs. Vissel Kobe
Nagoya Grampus
1st Half: Struggled to find Inagaki/Yonemoto in central areas in the build-up. Forced wide and lack of options. Most successful attacks via Morishita individual quality on the wing through dribbling his marker or combinations. Occasional counterattacks through the center are shut down by Kobe’s midfield or defense tracking back quickly. Uchida and Fujii had a rough time containing Muto and Osako’s combination play and physicality by themselves which forced Inagaki and Yonemoto to be very busy supporting them in the defensive 3rd.
2nd Half: Start similar to the 1st Half despite more concentrated attempts to build-up through the center due to continued press and block by Kobe’s midfield. Long diagonals across to switch to the far sided wing back weren’t of good quality or due to the amount of time the passes take, Kobe could slide over in time to defend them. Sakai’s presence as a 2nd striker after coming on in the 60th minute helped Nagoya somewhat. This was because he would push up next to Junker and along with Kobe’s midfield tiring a bit, the two strikers were able to stretch the gap between the defense and midfield lines for Inagaki and Yonemoto to receive the ball facing forward and play the ball long/short and keep possession more in Kobe’s half of the field. This was especially more so when Nagoya could evade the initial counterpress after winning the ball but otherwise still had problems and conceded lots of quick counterattacks.
Vissel Kobe
1st Half: Mix long and short passes in possession but the main recipient was Yuya Osako with long diagonal balls from the back-line being particular potent. Kobe could outnumberr Nagoya’s midfield with Osako’s dropping omvements while in turn, Ide or Muto would make darting runs behind the Nagoya defense. Defended in their usual 4-2-2-2 mid-block and very aware of closing off Inagaki and Yonemoto and limiting their ability to receive facing forward, forcing the build-up wide or long to prevent easy ball progression. Hatsuse had a bit of trouble dealing with Morishita 1v1 and the space behind him was exploited a few times but Kobe’s midfield would track back to support for numbers in the box so most crosses were cleared away with ease, even when Kobe’s defenders were pulled away from the box.
2nd Half: Initially like in the first half, Kobe’s pressing remained strong and kept a tight guard in central areas to launch short counters against Nagoya’s vertical passes in central areas. Had chances to score a 3rd but unable and slowly Nagoya turned the tide through their substitutions and able to settle in possession in Kobe’s half. Junker and Sakai added more pressure on the back-line and Kobe were forced deeper into their defensive 3rd. Kobe still didn’t let a whole lot of great chances but were out-done in the last minute of the game after Mitsuki Saito was sent off.
Player Interviews: (Nagoya) Haruya Fujii, Kasper Junker. (Kobe) Yoshinori Muto.
Manager Interviews: (Nagoya) Kenta Hasegawa. (Kobe) Takayuki Yoshida.
MD #11 (May 3rd, 2023): Shonan Bellmare vs. Kashiwa Reysol
Shonan Bellmare
1st Half: When making clearances or long balls and then pushing their lines up, Shonan then weren’t putting enough pressure on Reysol to prevent long balls back behind their high defensive line, nor was there enough midfield support for Machino to collect 2nd/loose balls. Most Shonan attacks came down the Left through Hata or Hiraoka but struggled to create shots and lost the ball cheaply. Defense and Song B.K. would kick it long too early, while the midfielders were trying to drop as options which isolated Machino further…
2nd Half: Much better in terms of actually trying to thread vertical passes into central areas and then advance forward via lay-offs and through ball combinations but still found it hard to enter the box and take shots as Reysol’s defenders would stick tight to ball receivers and there was support to cover when Reysol’s Center Backs stepped up. Shonan did put more pressure on Reysol’s back-line and forced them to clear or play long balls compared to the 1st Half but also after Reysol took the lead they were sort of fine with doing this anyway… Okuno got much more involved in the Center in the 2nd Half, as the recipient of lay-offs and playing through-balls or even pushing up to receive the ball in the final 3rd himself. Machino couldn’t get a clear sight on goal as 3/4 of his shots were blocked in/around the box as he couldn’t shake off the last Reysol defender before taking the shot. His only clear shot was a long range free kick.

Kashiwa Reysol
1st Half: Played simple long balls to Savio and Hosoya runs into the final 3rd. Quick and strong midfield prevent easy access into the center for Shonan and forced Shonan wide. Tatsuta and Koga were very aggressive to mark Machino but sometimes let a lay-off cleanly or lose the duel which gave Shonan lots of space to attack behind the defense (like for the offside disallowed goal). Takamine was given lots of time/space by Shonan to play accurate long balls vertically or diagonally to the front-line while Koga and Tatsuta were adventerous in doing the same as Shonan weren’t pressing as much as usual. Reysol’s defense were fairly comfortable collecting any long balls and clearances that came their way as they mainly only had to worry about Machino up top without support.
2nd Half: Not particularly amazing as Shonan pressed with more intensity in the 2nd Half which disrupted Reysol’s defenders and Takamine from passing the ball cleanly but didn’t matter too much as they went into “long and counter” mode after Hosoya took the lead. Tatsuta and Koga continued to step up to mostly good effect to intercept or block vertical passes. There were some dangerous moments when Shonan broke through the midfield after evading the Center Backs but Reysol always had midfield players covering back in the box so most shots were blocked or opponents were forced away from the box beforehand. Hosoya was left rather isolated up top but continued to work hard and fought for every single ball by himself against Shonan’s back-line to cause some trouble. Toshima was aggressive but not strong enough to stop Shonan’s midfield in the 2nd Half but still managed to collect loose balls and start attacks. Koga and Takamine were Reysol’s best players and in general Reysol looked fairly comfortable in defense in a solid 4-4-1-1 low block to see out the game.

Player Interviews: (Shonan) Daiki Sugioka, Akimi Barada. (Reysol) Sachiro Toshima.
Manager Interviews: (Shonan) Satoshi Yamaguchi. (Reysol) Nelsinho.
MD #11 (May 3rd, 2023): Avispa Fukuoka vs. FC Tokyo
FC Tokyo
1st Half: Tokyo were able to progress past Avispa’s press a fair bit through different combinations of stretching the field horizontally and midfielders dropping into spaces between the lines. However, Avispa were quick to retreat and pull back numbers to guard their own box and made it very difficult for Tokyo to break Avispa down. Still, Tokyo were attempting to pull and drag Avispa players around through the interchanging movement from Ryoma Watanabe, Shuto Abe, and Teruhito Nakagawa in the final 3rd but they weren’t able to create clear cut chances.
2nd Half: Avispa dialed up the press in the 2nd Half and Tokyo despite some decent sequences again, struggled to then create chances in the final 3rd and then slowly the game started to shift toward Avispa and they were able to score in the 71st minute. Albert Puig had attempted to switch to a back 3 but immediately following the goal switched back to a back 4 and I’m not quite sure what to make of it, even with his explanation in the post-match comments.
Avispa Fukuoka
1st Half: Avispa pressed high from the start to disrupt Tokyo’s build-up. They were only mildly successful in blocking some vertical passes to counter quickly or at the very least delay Tokyo from speeding up their tempo in the middle 3rd of the field. Even still, Avispa were so quick to track back including the forward players so Tokyo found it hard to break them down. Kazuya Konno was quite effective on the dribble in the first 20 or so minutes of the game but as usual his final pass/cross/shots weren’t great. Slowly FC Tokyo devised ways of restricting Konno and he saw less time on the ball in the latter stages of the 1st Half. Tsuruno made some smart runs to enter the box but he couldn’t get off a whole lot of clear shots. Lukian started the game as the Left Midfielder and he was working hard to track back and help out defensively.
2nd Half: Avispa slowly started to take control of the game but most of their chances came through set pieces and quick counters. Tsuruno’s movement continued to trouble Tokyo’s defense but Avispa still weren’t creating clear-cut chances.
Player Interviews: (Avispa) Kazuya Konno, Itsuki Oda. (FC Tokyo) Kei Koizumi.
Manager Interviews: (Avispa) Shigetoshi Hasebe. (FC Tokyo) Albert Puig.
MD #11 (May 3rd, 2023): Kyoto Sanga vs. Kawasaki Frontale
Kyoto Sanga:
1st Half: As usual, high agressive press from early on which caused a lot of trouble to Frontale’s build-up as they forced long balls and Sota Kawasaki was very good in the middle winning duels and pushing Kyoto forward. Kyoto still couldn’t create good opportunities when their tails were up though… Their best method of chance creation was from the Full Backs receiving high up the pitch to dribble 1v1 and cross.
2nd Half: Continued high press to cause problems in Frontale’s build-up. Even when 1st line was bypassed the midfielders tracking back and the defenders were able to stop Frontale from easily advance into the final 3rd. The only real problems came from not being able to prevent diagonal switches from Left ←→ Right which let Frontale move into the final 3rd quickly before Kyoto could shift over to the opposite side. Still, in the box, the defense was still able to easily clear Frontale’s high aerial crossing attempts. In attack, Kyoto were able to generate chances off quick counters or spreading the ball to the advanced Full Backs to cross but still nothing clear-cut to trouble Kamifukumoto in goal except for a few set-piece opportunities.
Kawasaki Frontale:
1st Half: Initially had a difficult time dealing with Kyoto Sanga’s press but gradually got used to it. Joao Schmidt was good at collecting loose and 2nd balls from duels to quickly transition through vertical passes into feet or long diagonal balls to the wings. Frontale were able to push Kyoto Sanga back and keep play in the opponent half but they found it difficult to break them down and enter the box. As a result, their threat mostly came from rather futile high crosses which the Kyoto defenders were able to deal with relative ease.
2nd Half: Weathered Kyoto’s press again and were able to shift Kyoto’s block to one side before escaping into lots of space on the opposite side to push into Kyoto’s half of the field. Still had same problems of creating quality chances in the final 3rd and while Oshima showed some quality he was not very press resistant as Kyoto simply continued to ramp up the pressure and Frontale couldn’t keep circulating the ball further up-field to really play to Oshima’s strengths (nevertheless he was the difference maker by providing an accurate cross for Kobayashi’s winner…).
Player Interviews: (Kyoto) Sota Kawasaki, Shogo Asada. (Frontale) Yu Kobayashi, Naoto Kamifukumoto.
Manager Interviews: (Kyoto) Cho Kwi-jae. (Frontale) Tohru Oniki.
MD #13 (May 14th, 2023): Kashima Antlers vs. Nagoya Grampus
Kashima Antlers
1st Half: Narrow 4-4-2 block with front 4 restricting access to Nagoya’s Center Midfielders. Nago (Right Mid) not jump to challenge Fujii (Left Center Back) often and have Kakita chase to force wide instead. From there Nago would anticipate the pass into Morishita (Left Wing Back) and sandwich him on the side-line with Hirose (Right Back) to counter. Occasionally let vertical passes from Nakatani through between the lines but Sekigawa stepped up to challenge or Pituca and Higuchi slide over to surround. Ueda handle Nagai drifting into Left Wing to receive long balls 1v1 well. Usual long ball methods to attack or Pituca involvement in final 3rd.
2nd Half: Tired a bit or simply dropped the intensity of press in favor of defending deeper which let Nagoya pass down the wings or even find Central Midfielders between the lines. Kashima’s wide midfielders were pushed back by Nagoya wingback’s higher positioning. However, Kashima were set up in the box and looked fairly comfortable. With Nagoya willing to take more risks, it also meant more than a few chances to spring counters.
Nagoya Grampus
1st Half: Struggled against Kashima’s press and block. Nagoya’s Center Backs started quite narrow and did not have the space to carry forward as Kashima’s wide midfielders and strikers blocked path. Build-up forced wide and long balls to Nagai or attempt pass into wingbacks which were easily stolen for counterattacks. Nakatani had good attempts to play vertical passes between the lines for Junker dropping but he was quickly surrounded and led to counterattacks. Nagai was shepherded well by Ueda out wide and even in the few times Nagoya were able to break past Kashima’s lines, Nagoya weren’t able to speed up their attacks from the middle 3rd and weren’t able to attack the box with speed before Kashima’s defense could get ready. Later in the half, Center Backs started to spread out wide just a bit more which allowed them that extra bit of time and space on the ball as it forced Kashima’s players to take the extra distance to close them down but still couldn’t progress cleanly from there.
2nd Half: Fujii was able to push forward past the Half Line more as the Wing Backs stayed high-and-wide to push Kashima’s wide players backwards and Antlers also didn’t press as intensely as much. Junker and Nagai pushed up high and widened the gaps between Kashima’s midfield and defensive lines which allowed Inagaki, Yonemoto to receive square balls more easily. However, they still couldn’t push into the box as Kashima set up inside their box in numbers. Wing Backs were able to receive the ball higher but they were mostly contained in 1v1 situations to then cross, which was ineffective as Kashima had many layers of players in defense. Wing Backs could’ve used more support from Center Backs or other attacking players to peel away the layers of Kashima players out of central areas in and around the box.
Player Interviews: (Antlers) Tomoki Hayakawa, Yuma Suzuki. (Nagoya) Kensuke Nagai.
Manager Interviews: (Antlers) Daiki Iwamasa. (Nagoya) Kenta Hasegawa.
MD #14 (May 19th, 2023): Consadole Sapporo vs. Kyoto Sanga
Consadole Sapporo
1st Half: From the start, throw long balls down the field, especially targetting Kaneko on the Right Wing and use Kyoto’s high press momentum against them. Kaneko dribble 1v1 against Sato to enter box and Sapporo support by getting #s in the box and wait, trust in Kaneko to beat his man and concentrate on providing options inside the box. Miyazawa and Arano drop into the back-line to outnumber Kyoto’s press and swing the ball to the wide areas (over and behind Kyoto’s front 3) to progress forward. Miyazawa drop slightly to the left while Arano would drop in next to Okamura to his right. Fukumori and Tanaka are able to receive in space out wide as Kyoto’s Full Backs are pinned back in their own half by Sapporo’s wing backs. Patric shut down by Okamura except for goal scene but that also happened because Miyazawa and Arano were pushed so high up the pitch alongside the front 3 that there was a huge gap (as usual…) in the middle of the pitch from where Kyoto players could drop in to receive the ball and drag Sapporo’s Center Backs up the field.
2nd Half: Continue to give Kaneko the ball on the Right Wing to receive, led to another goal. Arano was very strong defensively and was the switch to start attacking transitions with his forward-thinking. Kyoto started the half strongly and then Sapporo’s injuries mounting led Kyoto to have more possession but even if they entered the final 3rd, Sapporo’s back-line was very strong and Okamura especially headed or tackled away everything near the box. Supachok with another bright cameo but not really useful when forced to defend deep without the ball after Baba went off injured. Another Lucas cameo as he regains full fitness which is nice but injuries are starting to really pile up especially in the back-line and midfield. I do hear that Fukai is back in training though.
Kyoto Sanga
1st Half: Poor high press early on that was easily evaded by Sapporo who were able to find Tanaka and Fukumori in plenty of space due to the way Kyoto’s front 3 pressed the back-line and how Kyoto’s Full Backs couldn’t step up due to Sapporo’s wingbacks. Also, they had a hard time doing the simple stuff like settling clearances and long balls before coming under lots of intense Sapporo counterpress in the middle 3rd of the pitch. Most of the half, long balls into the half-spaces for Patric were shepereded by Okamura but slowly Kyoto were able to find some ways to attack in transition by exploiting Sapporo’s press themselves. With how aggressive Sapporo are, there were huge gaps between the midfield and defense lines that gave room for Patric or Kimura to drop in and receive the ball with their back to goal. From there they could lay the ball off or spin around and spread the ball to the wide areas in the space vacated by the Sapporo’s wingbacks to get into the final 3rd (see 35:30 and 40:45).
2nd Half: Start off the half brightly but still can’t find clear-cut chances in the box despite progression more into the final 3rd. Kimura was very strong to hold-up the ball under pressure or dribble past his immediate marker but from there he couldn’t enter the box all by himself as there were many layers to Sapporo’s defense. Kyoto’s press improved and they were able to shut down those lofted balls to the wide Center Backs on the side lines from Sugeno/Okamura. This was mainly because the Kyoto Wingers shifted back to press them but on the other hand, this then left Sapporo’s central players with a bit more time on the ball. Despite Sapporo’s troubles through injuries, Kyoto couldn’t really work their way into the box for clear-cut shots.
Player Interviews: (Kyoto) Patric. (Sapporo) Daiki Suga, Yuya Asano.
Manager Interviews: (Kyoto) Cho Kwi-jae. (Sapporo) Mischa Petrovic.
Matchday #14 (May 20th, 2023): Avispa Fukuoka vs. Urawa Reds
Avispa Fukuoka
1st Half: Keep 4-4-2 compact block as usual. Disrupt and win ball when vertical passes played by Urawa defenders into central areas and counter quickly. Koroki and others handled well by Grolli stepping up or Mae/Shigemi sandwiching them inside the midfield block. Occasionally press high but mostly have two strikers push Urawa’s Center Backs wide and prevent quick switches across the back-line. There were times when Avispa were able to slow the game down and pass the ball calmly across their back-line as Urawa didn’t press high and occasionally were able to progress through the Center through lay-offs and spreading the ball wide. Avispa also created opportunites through collecting 2nd/loose balls in Urawa’s half and pinning them back inside their defensive 3rd but not really create clear-cut chances. Lukian and Konno involved in lots of defensive work tracking back. Konno was main attacking threat through his direct dribbling leading to lots of crosses and shots but just doesn’t have the quality in his end-product to really scare Urawa…
2nd Half: After Akimoto was subbed off, Lukian started to have much more presence in the final 3rd (whereas he was rather quiet in attack in the 1st Half) to create opportunities on the Left side. This 10 minutes spell before Skorza realized his mistake and put Mawatari on and pushed Sekine back into midfield but Avispa weren’t able to capitalize as Nishikawa made some very good saves. Mae continued to stop most attacks and was especially effective in helping to stop Jose Kante from having an impact, although Avispa did have some trouble with quick counters late in the 2nd Half.
Urawa Reds
1st Half: Urawa’s game plan seemed to spread the ball wide from side-to-side to stretch Avispa’s blocks of 4 horizontally and get their very direct attacking Full Backs on the ball high up the pitch outside the reach of Avispa’s wide midfielders (Konno/Lukian) to progress into the final 3rd. However from there, Urawa couldn’t find the pass inside in the final 3rd and attacks mostly end up in aerial crosses where Avispa had an easy time clearing, as well as the fact that Urawa didn’t get numbers into the box. Only real danger moment was Koroki’s cut-back across the 6 yard box for the (VAR offside) disallowed goal. Urawa were forcing vertical passes into the center for my liking, many which were intercepted for counterattacks but also being wasteful by playing long balls for attackers isolated vs. Avispa’s strong back-line. With Iwao dropping deep to help the Center Backs, it meant there were less people to help Koroki which made these passes rather ineffective. Scholz and Hoibraten were spread wide to carry the ball forward on the outside of Avispa’s front 2 but they couldn’t always find the optimal pass. Attempts into the half-spaces were well guarded by Avispa while they had better success finding the Full Backs in the wide areas but like previously stated, there wasn’t much Urawa could do after that.
2nd Half: Started the 2nd Half quite well as Urawa had more variety in movement in the final 3rd, higher tempo from the Center Backs to the Full Backs, and played incisive diagonal balls from the wide areas into the half-spaces or box but weren’t able to connect these to actual shots (
48:40, 52:15, 55:20). Urawa had a rough time when Sekine was moved to Right Back but just about managed to not concede until Mawatari came on. Iwao continued to play far too deep and couldn’t really push Urawa forward despite the Center Backs being able to spread out wider in the defensive/mid-3rd. Schalk’s touch was very poor and killed most attacks down the Left Wing. Kante had a tough time surrounded by Avispa players but in certain transition moments was useful in settling the ball and quickly progressing forward but didn’t lead to anything…
Note: Skorza mentioned that both Hiroki Sakai and Yoshio Koizumi are injured.